User-agent: facebot User-agent: twitterbot User-agent: Photon/1.0 User-agent: CCBot User-agent: GPTBot User-agent: ChatGPT-User User-agent: anthropic-ai User-agent: FacebookBot User-agent: Amazonbot User-agent: Applebot Disallow: /

aperture

How did I create this image

Camera: Canon EOS 5DS R

Lens: Canon EF100-400mm f/4.5-5.6L IS II USM, with a focal length at 400 mm

f/11, 1/80 second, ISO 1600

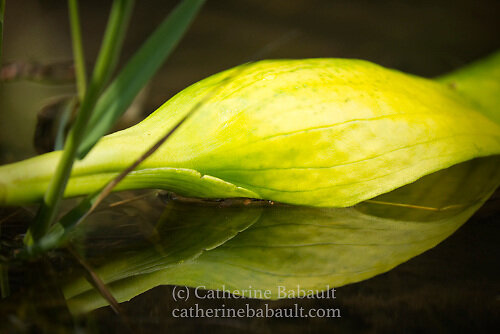
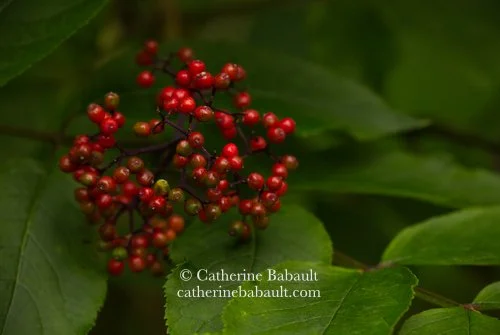
Participants to my photo workshops often ask me about my thought process when I shoot. In this case the first thing I noticed, while walking in the forest, were the red berries and green foliage. When we look at a photograph or a painting, our eyes are unconsciously attracted to elements in red in the overall composition. In addition, red and green are opposite to each other in the wheel of colour, they are complementary colours like blue and orange, and yellow and violet. The use of complementary colours in photography creates a bold image.

My next step consisted of framing my subject so I moved around it to find the best angle. Should I look down, look up, be at eye-level, where is the light coming from? I also took into consideration distracting elements such as bright areas, leading lines, branches, damaged foliage, etc. I chose a telephoto lens to isolate my subject and I used a tripod for stability. Next I thought about the mood of my image and determined the depth of field, aperture and shutter speed. I chose to underexpose by one full stop. I also used a polarizing filter to suppress the reflection of light on the shiny surface of the berries.

In conclusion, I prefer to take my time in the field than spending hours in front of my computer screen trying to fix my mistakes. Afterall I love nature much more than my computer!

If you would like to learn more about my photo workshops, please contact me. I will be more than happy to help you hone your skills in nature and wildlife photography.

Learn more about the triangle of exposure

Long exposure of a leaf caught in strong current.

Long exposure, wide depth of field: f/11 for 1/8 second, ISO200

The word photography comes from the ancient Greek: photos (light). Understanding and mastering exposure is therefore essential in the art of photography. The shutter speed, the (diaphragm) aperture and the ISO are the three elements, which form the triangle of exposure.

The shutter speed is determined by how long the shutter stays open. The sensor in digital cameras will capture more light when the shutter stays open longer. A slow shutter speed (for example 1/10 second) can be used in low-light environment or to create a motion blur (waterfalls, rain streaks) while a fast shutter speed (for example 1/1000 second) is used to freeze a movement like a bird in flight.

Fast exposure, short depth of field: f/5.6 for 1/800 second, ISO1250

The aperture (f/N) is short for diaphragm aperture. A small aperture like f/22 does not allow a lot of light to pass through the lens, however it provides a wide depth of field and is commonly used in landscape photography. A big aperture like f/5.6 lets more light pass through the lens and it also provides a narrow or short depth of field.

The ISO is related to the film sensitivity to light or image sensor’s sensitivity to light on digital cameras. On a sunny day, photographers typically use a low ISO (100) but in low-light situation (overcast day, night), they increase the ISO. Note that a high ISO (3,200 or more) will create noise in your image (grainy veil).

Photo Technique: What is the triangle of exposure?

It allows you to control the exposure by setting up the shutter speed, lens aperture and ISO based on the intended mood of your photograph. A slow shutter speed will change rain or snow in streaks; it can also be used to isolate the subject. A small lens aperture gives a wide depth of field, where all elements of the image are in focus. Low ISO can be used for a long exposure.

Slow shutter speed

Slow shutter speed

Small lens aperture

Small lens aperture

Upcoming workshops

Photo Technique: How to reduce noise in an image?

There are a few actions you can take:

  • Expose to the right by either opening up the lens aperture or by using a slower shutter speed. An underexposed image later brightened on a computer will result in a lot of noise and other artefacts.

  • Determine your camera’s high ISO capability by conducting a simple test. Place your camera on a tripod and take the same photograph of a subject with dark areas, at various ISO starting at 100 all the way up by increment of full stops. Verify the progression in the amount of noise by enlarging each image on your computer screen.

_ABO9041a.jpg
Upcoming Workshops

Photo Technique: What makes a compelling image?

Many factors are to be considered but professional photographers, photo editors and jury members on photo competitions agree that what makes a compelling image is a unique perspective on the subject, sharpness and good composition. How to create a good composition? Keep it simple! Isolate your subject by getting rid of distracting elements, determine your source of light and use the elements of design: lines, pattern, shape and texture.

Upcoming Workshops

Photo Technique: : How to obtain maximum focus?

Use a small aperture such as f/16, low ISO, make sure the back of your camera is parallel to your subject and use your tripod.

_ABN3571a.jpg

The Basics of Photography

Composition, exposure, shutter speed, ISO, aperture, opening up, spotlighting, centre-weighted meter: you might be familiar with some of these terms but it’s not always obvious how to adjust your camera accordingly. I offer half-day and multi-days workshops to help you understand and practice the fundamentals of photography. Once you master the basics, you’ll be able to take manual control of your camera and get better results.


All my workshops are given in the field for a hands-on experience. Get in touch so we can arrange for a workshop.

_ABN2901a.jpg
Upcoming workshops

Triangle of exposure

Three elements constitute the triangle of exposure: aperture, shutter speed and ISO:

  • Aperture (f/N): light passing through the lens

  • Shutter speed: how long the shutter stays open

  • ISO: image sensor’s sensitivity to light

A small aperture (i.e. f/16) gives a deep depth of field and is usually used for landscape.

A fast shutter speed (i.e. 1/1000 sec) is used to freeze motion, like birds in flight or action shots. It also gives a shallow depth of field.

A slow shutter speed (i.e. 1/4 sec) is great for motion blur like milky water effect or rain streaks. Slow shutter speed is also used for night photography or poorly lit areas. In any case, a tripod is highly recommended for long exposures.

Before you adjust the aperture, shutter speed and ISO on your camera, you need to ask yourself: What effect do I wish to create? What is the mood of my image? What am I trying to tell?

Use the light meter in your camera to help you get the proper exposure. Light is measured in Exposure Value (EV) and typically displays in cameras from - 3 EV to + 3 EV

-3 _____ -2 _____ -1 _____ ∆ _____ 1 _____ 2 _____ 3

under exposed correct expo. over exposed

Once you’ve taken your shot, check the histogram and readjust your exposure if necessary.

Time to practice. Let me know how it goes!