User-agent: facebot User-agent: twitterbot User-agent: Photon/1.0 User-agent: CCBot User-agent: GPTBot User-agent: ChatGPT-User User-agent: anthropic-ai User-agent: FacebookBot User-agent: Amazonbot User-agent: Applebot Disallow: /

photo technique

When to use a polarizing filter

A polarizing filter is used to reduce reflections and glare from surfaces such as water or glass. Reflections are almost everywhere in nature: light bouncing off wet leaves or rocks surrounding waterfalls. In addition, a polarizing filter increases colour saturation, darken skies and reduces atmospheric haze.

The disadvantage of a polarizing filter is the loss of light that comes through your lens. I recommend a high quality circular polarizing filter to reduce the loss of light between 1 and 1.5 stop. You can compensate that loss by reducing the shutter speed, using a bigger aperture or increasing the ISO. Make sure that both your lens and polarizing filter are clean and free of dust.

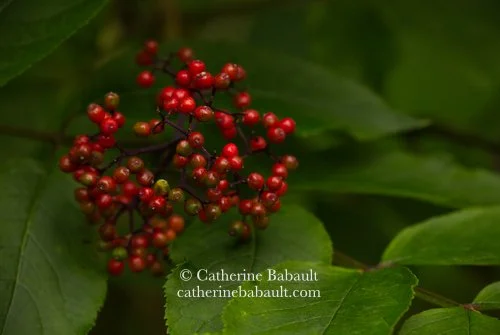
These photos demonstrate what a polarizing filter can do when the light bounces off the surface of wet leaves. Note that I used a telephoto lens to isolate my subject and a short depth of field to blur the background.

red leaves, shrub, winter, Vancouver Island, British Columbia, Canada, rights-managed, stock images, © Catherine Babault

How did I create this image

Camera: Canon EOS 5DS R

Lens: Canon EF100-400mm f/4.5-5.6L IS II USM, with a focal length at 400 mm

f/11, 1/80 second, ISO 1600

Participants to my photo workshops often ask me about my thought process when I shoot. In this case the first thing I noticed, while walking in the forest, were the red berries and green foliage. When we look at a photograph or a painting, our eyes are unconsciously attracted to elements in red in the overall composition. In addition, red and green are opposite to each other in the wheel of colour, they are complementary colours like blue and orange, and yellow and violet. The use of complementary colours in photography creates a bold image.

My next step consisted of framing my subject so I moved around it to find the best angle. Should I look down, look up, be at eye-level, where is the light coming from? I also took into consideration distracting elements such as bright areas, leading lines, branches, damaged foliage, etc. I chose a telephoto lens to isolate my subject and I used a tripod for stability. Next I thought about the mood of my image and determined the depth of field, aperture and shutter speed. I chose to underexpose by one full stop. I also used a polarizing filter to suppress the reflection of light on the shiny surface of the berries.

In conclusion, I prefer to take my time in the field than spending hours in front of my computer screen trying to fix my mistakes. Afterall I love nature much more than my computer!

If you would like to learn more about my photo workshops, please contact me. I will be more than happy to help you hone your skills in nature and wildlife photography.

Finding your composition

I used four different methods for these photos. When I find a subject, I take the time to think about how I want to represent it. Do I want to isolate it from its environment by using a short depth of field or by framing it closely or on the contrary do I want to place it in its environment with a wide depth of field and framing it in full? I also look for a unique composition.

Subject in its environment

Vertical format, use of a telephoto lens to isolate the subject and eliminate distracting elements like branches, the colour of the leaves pops against the brown bark of the trees and the light blue background makes it all stand out.

f/5.6 ISO1250 1/20 second

Horizontal format, use of a telephoto lens to isolate the subject, large depth of field, subject off centre, the subject stands out against the darker background and the yellow grass.

f/9 ISO3200 1/50 second

Close-up

Close-up to eliminate distracting elements and use of complementary colours (red and green) to create a bold effect.

f/9 ISO3200 1/50 second

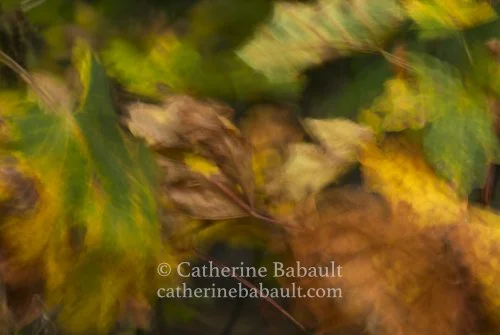
Close-up to eliminate distracting elements and long exposure to blur the leaves and give the impression of movement.

f/18 ISO200 1/2 second

The best way to learn is to practice in the field with a professional. I invite you to register for my workshop Fall Colors on Vancouver Island from 12 to 15 October 2023. We will spend three days in the field, entirely dedicated to nature and wildlife photography. You’ll have my full attention by being part of a small group of 5 people. This is a popular workshop, sign up early!

Vancouver Island Photo Tours and Workshops: Spring on Vancouver Island, May 26 to 28, 2023

(le texte en français suit)

Early bird gets a free healthy lunch and a guaranteed spot!

Spring has finally arrived on Vancouver Island with warmer and sunnier days. The tops of mountains are still covered by snow but the snowmelt has started. Streams are swelling and they provide great opportunities for photographing waterfalls in the lush temperate rainforest. In addition, at this time of the year, birds and mammals are busy caring for their young. Don’t miss this magnificent time of the year when nature regenerates and offers one of its most beautiful shows.

Only a few spots left, sign up today!


Inscrivez-vous tôt et obtenez un lunch santé gratis en plus de garantir votre place !

Le printemps est enfin arrivé sur l'île de Vancouver avec des journées plus chaudes et ensoleillées. Le sommet des montagnes est encore enneigé mais la fonte des neiges a commencé. Les ruisseaux sont gonflés et offrent de belles opportunités pour photographier les cascades dans la luxuriante forêt pluviale tempérée. En plus, à ce temps-ci de l’année, les oiseaux et les mammifères sont occupés à prendre soin de leurs petits. Ne manquez pas ce magnifique moment de l’année où la nature se régénère et offre un de ses plus beaux spectacles.

Il ne reste que quelques places, inscrivez-vous dès aujourd’hui !

Apprenez-en davantage sur la profondeur de champs

Une courte profondeur de champs isole le sujet. Elle le fait ressortir contre un arrière-plan flou parce que l’oeil de l’observateur est naturellement attiré par un sujet net. Pour ce plan rapproché d’une biche, j’ai choisi un téléobjectif (focale longue de 400 mm) et une grande ouverture à f/5.6. À noter qu’une vitesse d’obturation élevée réduit également la profondeur de champs.

doe black-tailed deer, Odocoileus hemionus columbianus, Vancouver Island, British Columbia, Canada, rights-managed, © Catherine Babault

Canon EOS 5DS R - Objectif Canon EF 100-400 mm f/4.505.6L IS II USM

f/5.6 pendant 1/200 seconde et 1600 ISO, focale longue de 400 mm

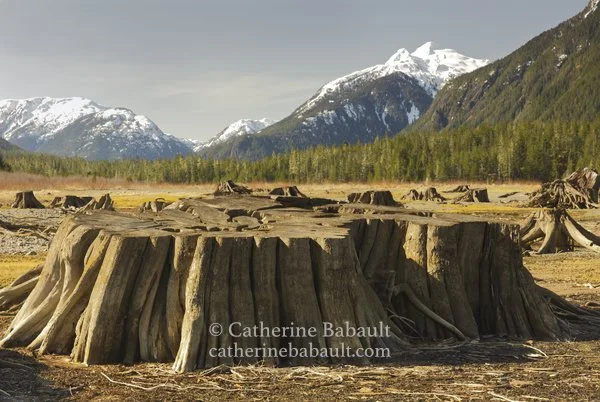
Une grande profondeur de champs met le sujet en contexte. L’image entière est nette ainsi l’observateur tend à regarder le sujet en relation avec ce qui l’entoure. Ici j’ai voulu montrer la souche d’un arbre ancien par rapport à la forêt et les montagnes en arrière-plan. J’ai donc choisi un objectif à grand angle (focale courte de 70 mm) et une petite ouverture de f/11.

stump of an old-growth tree and view of mountains, Vancouver Island, British Columbia, Canada, rights-managed, © Catherine Babault

Canon EOS 5DS R - Objectif Canon EF 24-70 mm f/2.8L II USM

f/11 pendant 1/30 seconde et 400 ISO, focale courte de 70 mm

New workshops for this summer!

Summer is an ideal time to reconnect with nature and hone your skills as a nature photographer. Join me for a unique photo workshop in beautiful Strathcona Park, on Vancouver Island, British Columbia, Canada.

I have added three new workshops on weekends for your convenience:

Limited to 5 participants. Sign up today!

Spot Distracting Elements

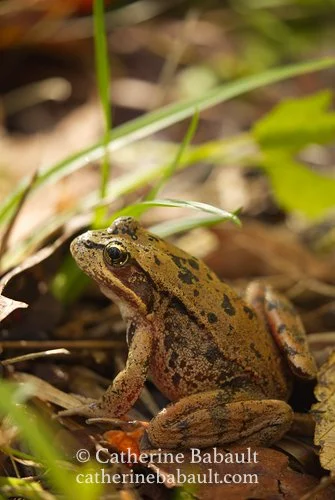
When I am on a photo excursion in the forest, the red-legged frog tends to appear when I least expect it. Their colour is an excellent form of camouflage. Often, it is their leap at my approach that catches my eye. During any chance encounter with an animal, it is sometimes difficult to predict their reaction: will they run away or stay put? That’s why my first reaction is to stop and anticipate their intentions. Then I started moving cautiously to avoid frightening them while I think about my composition and my distance from the animal.

red-legged frog, Vancouver Island, British Columbia, Canada. © Catherine Babault

Spot the distracting elements in this image.

I determine where the light is coming from and if there is a backlight. I identify elements such as a branch in front of the frog or any other shape or object that might distract the attention of the person looking at the photo. I move slowly and, once in position, I carefully deploy my tripod. A stressed frog will puff up its abdomen to deter predators. I therefore keep an eye on my subject to assess their level of comfort; if I notice that they are stressed, I leave even though I have not got a shot. The animal wellbeing is more important to me than my portfolio. Once the camera is mounted on the tripod, I adjust the settings and frame based on the intended result before releasing the shutter. Then I check the composition and histogram on the camera screen.

Because it is a chance encounter with a wild animal, everything happens very quickly and yet quietly so as not to stress it. Also I don’t overstay to avoid disturbing the animal in its routine.

Final result after I repositioned myself. Photo in full format.

Repérez les éléments distrayants

Lorsque je suis en excursion photo dans forêt, les grenouilles à cuisse rouge ont tendance à apparaître quand je m’y attends le moins. Leur couleur est une excellente forme de camouflage. Bien souvent, c’est leur saut à mon approche qui attire mon attention. Lors de toute rencontre fortuite avec un animal,  il est parfois difficile de prévoir leur réaction : vont-ils s’enfuir ou bien rester sur place ? C’est pourquoi ma première réaction est de m’arrêter et anticiper leurs intentions. Ensuite je bouge avec précaution pour éviter de les effrayer et je commence aussitôt à penser à ma composition et à ma distance par rapport à l’animal.

grenouille à cuisse rouge, Ile de Vancouver, Colombie-Britannique, Canada. © Catherine Babault

Cherchez les éléments distrayants sur cette photo.

Je détermine d’où vient la lumière et s’il y a un contre-jour. J’identifie des éléments comme une branche devant la grenouille ou tout autre forme ou objet qui pourrait distraire l’attention de la personne qui regardera la photo. Je me déplace doucement et, une fois en position, je déploie mon trépied lentement. Une grenouille stressée va gonfler son abdomen, c’est une façon de décourager les prédateurs. Je garde donc un oeil sur mon sujet pour évaluer son niveau de comfort; si je constate qu’elle est stressée, je pars même si je n’ai pas obtenu de photo. Le bien-être de l’animal est plus important pour moi que mon portfolio. Une fois l’appareil fixé sur le trépied, j’effectue les réglages et cadre en fonction du résultat visé avant de déclencher l’obturateur. Puis je vérifie la composition et l’histogramme sur l’écran de l’appareil photo.

Comme il s’agit d’une rencontre fortuite avec un animal sauvage, tout se passe très rapidement et cependant tranquillement pour ne pas le stresser. J’évite aussi de rester trop longtemps pour ne pas déranger l’animal dans sa routine.

grenouille à cuisse rouge, Ile de Vancouver, Colombie-Britannique, Canada. © Catherine Babault

Résultat final après m’être repositionnée. Photo en plein format.

Apprenez-en davantage sur le triangle d’exposition

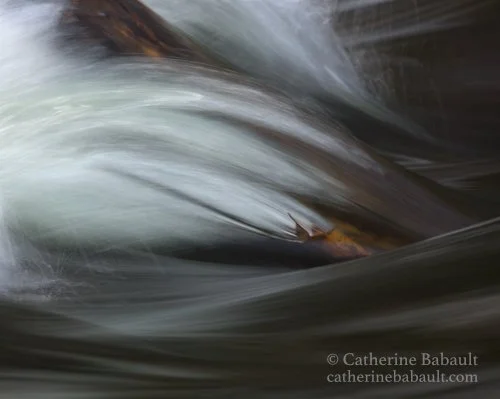
Exposition longue d'une feuille prise dans le courant.

Exposition longue, grande profondeur de champs: f/11, 1/8 seconde, 200 ISO

Le mot photographie vient du grec ancien : photos (lumière). C'est pourquoi il est important de bien comprendre et maîtriser l'exposition en photographie. La vitesse d'obturation, l'ouverture du diaphragme et les ISO sont les trois éléments qui forment le triangle d'exposition.

La vitesse d'obturation est déterminée par la durée pendant laquelle l'obturateur reste ouvert. Le capteur des appareils photo numériques capte plus de lumière lorsque l'obturateur reste ouvert plus longtemps. Une vitesse d'obturation lente (par exemple 1/10 de seconde) peut être utilisée dans un environnement faiblement éclairé ou pour créer un flou de mouvement (cascades, traînées de pluie) tandis qu’une vitesse d'obturation rapide (par exemple 1/1000 seconde) est utilisée pour figer un mouvement comme un oiseau en vol.

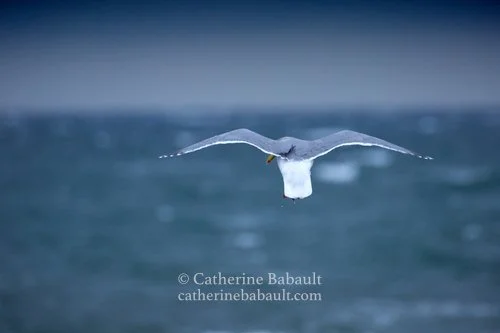
Mouette surfant dans le vent lors d'une tempête hivernale.

Exposition rapide, courte profondeur de champs : f/5.6, 1/800 seconde, 1250 iSO

L'ouverture (f/N) est une abréviation pour l’ouverture du diaphragme. Une petite ouverture comme f/22 ne laisse pas passer beaucoup de lumière à travers l'objectif, mais elle offre une grande profondeur de champ et est couramment utilisée en photographie de paysage. Une grande ouverture comme f/5.6 laisse passer plus de lumière à travers l'objectif et fournit également une profondeur de champ étroite ou courte.

L'ISO est lié à la sensibilité du film à la lumière ou bien la sensibilité du capteur d'image à la lumière sur les appareils photo numériques. Par une journée ensoleillée, les photographes utilisent généralement un ISO bas (100) mais dans des situations de faible luminosité (temps couvert, nuit), ils augmentent l'ISO. Notez qu'un ISO élevé (3 200 ou plus) crée du bruit dans votre image (voile granuleux).

Learn more about the triangle of exposure

Long exposure of a leaf caught in strong current.

Long exposure, wide depth of field: f/11 for 1/8 second, ISO200

The word photography comes from the ancient Greek: photos (light). Understanding and mastering exposure is therefore essential in the art of photography. The shutter speed, the (diaphragm) aperture and the ISO are the three elements, which form the triangle of exposure.

The shutter speed is determined by how long the shutter stays open. The sensor in digital cameras will capture more light when the shutter stays open longer. A slow shutter speed (for example 1/10 second) can be used in low-light environment or to create a motion blur (waterfalls, rain streaks) while a fast shutter speed (for example 1/1000 second) is used to freeze a movement like a bird in flight.

Fast exposure, short depth of field: f/5.6 for 1/800 second, ISO1250

The aperture (f/N) is short for diaphragm aperture. A small aperture like f/22 does not allow a lot of light to pass through the lens, however it provides a wide depth of field and is commonly used in landscape photography. A big aperture like f/5.6 lets more light pass through the lens and it also provides a narrow or short depth of field.

The ISO is related to the film sensitivity to light or image sensor’s sensitivity to light on digital cameras. On a sunny day, photographers typically use a low ISO (100) but in low-light situation (overcast day, night), they increase the ISO. Note that a high ISO (3,200 or more) will create noise in your image (grainy veil).

Nature Photography Workshops on Vancouver Island, British Columbia, in 2022

Whether you are already on Vancouver Island or planning to visit this year, here is a list of my photo workshops in 2022:

  • 29 January - Strathcona Park

  • 26 February - Strathcona Park

  • 21-23 March - Herring Spawn on Vancouver Island

  • 27-29 May - Spring on Vancouver Island

  • 19-23 September - Tofino (in French only)

  • 3-7 October - Tofino

  • 13-16 October - Fall Colours on Vancouver Island

  • Half-day photo workshop, Comox Valley (in English only) : 14 May, 11 June, 9 July, 13 August

  • Half-day photo workshop, Comox Valley (in French only) : 7 May, 4 June, 2 July, 6 August

If you prefer, you can request a private workshop that ranges from one day to several days. Book early as I am already starting to get requests for this summer.

I look forward to showing you my favourite places on Vancouver Island for nature photography and helping you improve your photography skills!

Ateliers de photographie de nature sur l'Île de Vancouver, Colombie-Britannique, en 2022

Que vous soyez déjà sur l’Île de Vancouver ou que vous prévoyez de la visiter cette année, voici une liste de mes ateliers photo en 2022 :

  • 29 janvier - Strathcona Park

  • 26 février - Strathcona Park

  • 21-23 mars - Herring Spawn on Vancouver Island

  • 27-29 mai - Spring on Vancouver Island

  • 19-23 septembre - Tofino (en français seulement)

  • 3-7 octobre - Tofino

  • 13-16 octobre - Fall Colours on Vancouver Island

  • Ateliers photo d’une demi-journée, Vallée de Comox (en français seulement) : 7 mai, 4 juin, 2 juillet, 6 août

  • Ateliers photo d’une demi-journée, Vallée de Comox (en anglais seulement) : 14 mai, 11 juin, 9 juillet, 13 août

Si vous préférez, vous pouvez demander un atelier privé qui va d’une journée à plusieurs jours. Réservez tôt car je commence déjà à recevoir des demandes pour cet été.

Au plaisir de vous montrer mes endroits préférés sur l’Île de Vancouver pour la photographie de nature et de vous aider à améliorer vos techniques en photographie !

Atelier au Congrès virtuel de l'APPIPC 2021

Le 22 octobre, j’ai eu l’honneur de donner un atelier sur la photographie de nature lors du Congrès virtuel de l’APPIPC dont le sujet cette année est En harmonie avec la nature. C’est toujours un plaisir de partager ma passion pour la photographie avec un auditoire intéressé et engagé.

Je donne des ateliers virtuels dans les écoles de la maternelle à la 12e année (K-12), en français et en anglais, en Amérique du Nord et au-delà. Contactez-moi pour réserver un atelier dans votre établissement scolaire.

Photographing Roosevelt Elk

Some species are more active than others at dusk like the Roosevelt elk. It means that I have to get up in the middle of the night to photograph them because the herd that I became familiar with lives several hours away from my town.

I have been photographing this herd for the past few years and I always anticipate our potential encounters. Nothing is guaranteed with wildlife. They might not show up or I might have to quietly wait for hours.

I have a favourite spot to photograph this herd of elk from a safe distance and with a clear view. During a recent visit, as I was walking towards that spot, I noticed that the herd was already heading in that direction. I had to walk faster, yet quietly, without them noticing my presence. I got there first, set up my tripod and camera and waited a few minutes. I could hear them moving in the woods and stepping on dry sticks. When they came out of the woods, the cows were the first to go across the river surrounding the calves, most likely to protect them from potential predators. The last one to appear, closing the march, was the buck with its majestic set of antlers. I had only five minutes to photograph them before they disappeared again from my view and I cherished every minute.

Each time I see this herd, I feel very privileged to witness important milestones in their lives, to see the cows pregnant or suckling their calves, to observe yearlings playfully chasing each other or to see the buck proudly walking around its harem of a dozen cows. With the start of the rut, I look forward to getting more behavioural shots particularly of the buck.

Nature First

Ethics in Nature Photography

Most of us enjoy to be in nature for inspiration, sport activities or simply for our mental well-being. The great outdoors, the beauty of the landscapes and the chance encounters with the fauna allow us to find ourselves and take a breather. As a nature photographer, I much prefer to spend my time outdoors than in front of my computer. However, when I am in the field, I realize that I am in a world that does not belong to me. Here live plants and animals while I am only a visitor, and it is clear that each of our passages disturbs ecosystems, bubbles of life.

This is why I strive to reduce my impact on the environment by applying ethical principles in my profession as a photographer, even if it is sometimes to the detriment of the end result of my expeditions: what is essential for me is not to get the photo of the century but to respect nature. Patience and perseverance then become key factors in obtaining interesting photos, especially of the behaviour of wild animals in their natural environment.

B094014a.jpg

When I had the privilege of photographing an elk nursing three calves, it was she who established the distance between us and determined the length of the encounter. When she quietly returned to the forest, I could have followed her for a personal purpose of getting more photographs, but I thought about the stress that would cause them. My calm and respectful attitude towards wildlife allows me to experience intimate moments like this one where everyone observes and assesses each other before continuing their activities. Only patience and determination give great results, in addition to the satisfaction of respecting nature.

La nature avant tout

L’éthique dans la photographie naturaliste

La plupart d’entre nous aimons être dans la nature pour y trouver de l’inspiration, pratiquer un sport ou tout simplement pour notre bien-être mental. Le grand air, la beauté des paysages et les rencontres fortuites avec des animaux nous permettent de nous retrouver et de souffler un peu. En tant que photographe naturaliste, je préfère nettement passer mon temps à l’extérieur que devant mon ordinateur. Cependant, lorsque je suis sur le terrain, je suis consciente d’être dans un monde qui ne m’appartient pas. Ici vivent des plantes et des animaux alors que je ne suis qu’un visiteur et il est clair que chacun de nos passages dérange des écosystèmes, des bulles de vie.

C’est pourquoi, je m’efforce de réduire mon impact sur l’environnement en appliquant des principes d’éthique dans mon métier de photographe, même si c’est parfois au détriment du résultat final de mes expéditions : ce qui est primordial pour moi n’est pas d’obtenir la photo du siècle mais bien de respecter la nature. La patience et la persévérance deviennent alors des facteurs clefs pour obtenir des photos intéressantes, notamment du comportement des animaux sauvages dans leur milieu naturel.

B094014a.jpg

Lorsque j’ai eu le privilège de photographier une wapiti en train d’allaiter trois petits, c’est elle qui a établi la distance entre nous et qui a déterminé la durée de la rencontre. Lorsqu’elle est repartie tranquillement dans la forêt, j’aurai pu la suivre dans un but personnel, celui d’obtenir plus de photographies, mais j’ai pensé au stress que ça leur causerait. Mon attitude calme et respectueuse envers la faune me permet de vivre des moments intimes comme celui-ci où chacun s’observe, s’évalue avant de poursuivre ses activités. Seules la patience et la détermination donnent d’excellents résultats, en plus de la satisfaction de respecter la nature.

Photo Workshops during the COVID-19 Pandemic - Ateliers photo pendant la pandémie de COVID-19

_B090762a.jpg

All the workshops are given in small groups (5 participants max) and in the outdoors so you are less likely to get or spread COVID-19. You can either join an already scheduled workshop or ask for a private workshop for yourself or as members of the same bubble at no extra cost. We offer half-day, weekend and multi-day workshops all year-round. Feel free to contact us for details.

During the pandemic, we take all necessary precautions to ensure your safety. We ask everyone attending the outdoor event to maintain a physical distance of 2 metres between one another, unless you reside together. We recommend the use of a mask and we supply hand sanitation gel.

The day prior to the start of the workshop, you will be asked whether you have symptoms of COVID-19, have been in close contact with someone who has confirmed or suspected COVID-19. If you have any symptoms of COVID-19 prior to the workshop, please inform us immediately; we will reschedule you for another workshop once you have fully recovered.

Below are the current travel restrictions for Vancouver Island, BC:

  • Vancouver Island residents are allowed to travel within the Vancouver Island Health region for recreational purposes.

  • For British Columbians, travel is allowed within your health zone. Non-essential travel between health zones continues to be restricted.

  • For Canadians, all non-essential travel to BC must be avoided until further notice.

  • For international visitors, the Canadian border remains closed for non-essential travel, including those who have been vaccinated.

For current travel information, visit https://www.hellobc.com/what-you-need-to-know/

Further details on the current orders can be found at: gov.bc.ca/COVID-19

Ateliers photo pendant la pandémie de COVID-19

Tous les ateliers sont donnés en petits groupes (5 participants max) et en plein air donc vous êtes moins susceptible d'attraper ou de propager le COVID-19. Vous pouvez soit rejoindre un atelier déjà programmé, soit demander un atelier privé pour vous-même ou en tant que membre de la même bulle, et ce, sans frais supplémentaire. Nous proposons des ateliers d'une demie-journée, d'un week-end et de plusieurs jours tout au long de l'année. N'hésitez pas à nous contacter pour plus de détails.

Pendant la pandémie, nous prenons toutes les mesures nécessaires pour assurer votre sécurité. Nous demandons à tous ceux qui participent à l'événement en plein air de maintenir une distance physique de 2 mètres, à moins que vous ne viviez ensemble. Nous recommandons le port d'un masque et nous fournissons du gel désinfectant pour les mains.

La veille de l'atelier, nous vous demanderons si vous avez des symptômes de COVID-19 et si vous avez été en contact étroit avec un cas confirmé ou suspecté de COVID-19. Si vous avez des symptômes de COVID-19 avant le début l'atelier, veuillez nous en informer immédiatement ; nous vous reporterons votre inscription à un futur atelier lorsque vous serez complètement rétabli.

Vous trouverez ci-dessous les restrictions de voyage courantes pour l'île de Vancouver, en Colombie-Britannique :

  • Les résidents de l'île de Vancouver sont autorisés à se déplacer dans la région sanitaire de l'île de Vancouver à des fins récréatives.

  • Pour les Britanno-Colombiens, les déplacements sont autorisés dans votre zone sanitaire seulement. Les déplacements non essentiels entre les zones sanitaires continuent d'être limités.

  • Pour les Canadiens, tout voyage non essentiel en Colombie-Britannique doit être évité jusqu'à nouvel ordre.

  • Pour les visiteurs internationaux, la frontière canadienne reste fermée pour les déplacements non essentiels, y compris pour ceux qui ont été vaccinés.

Pour les dernières informations sur les voyages, visitez : https://www.hellobc.com/what-you-need-to-know/ (en anglais seulement)

Pour plus de détails sur les mesures en cours, visitez : gov.bc.ca/COVID-19 (en anglais seulement)

The story behind the image - L’histoire derrière l’image

Between 8,000 and 10,000 black bears inhabit Vancouver Island. The opportunities to meet one are high so it is better to learn more about the species. I recommend building a network of specialists such as conservation officers, biologists and knowledgeable local wildlife photographers. The best time of the year to observe bears is during the salmon return when bears converge to estuaries and rivers to fatten up on salmon before hibernation.

I took this image at a popular hatchery. In order to avoid the big crowds, I started early in the morning. It was technically challenging because the light was strong so there was a lot of contrast between the bright and dark areas. I used a telephoto lens to keep a safe distance and a polarizing filter to reduce the light reflection on the water and leaves. There may be long periods of time between bear appearances: some go straight back to the forest after getting a salmon, others laze around to the delight of photographers.

_ABN6413a1.jpg

Entre 8 000 et 10 000 ours noirs vivent sur l’Île de Vancouver. Les opportunités d’en rencontrer un étant élevées, il vaut mieux en apprendre davantage sur l’espèce. Je suggère d’établir un réseau de spécialistes comme des officiers de la conservation, des biologistes et des photographes animaliers locaux bien informés. La meilleure période de l’année pour observer les ours est lors de la fraie du saumon lorsque les ours convergent vers les estuaires et les rivières pour s’engraisser de saumon avant l’hibernation.

J’ai pris cette photo dans une station d’alevinage de saumon populaire. Afin d’éviter la foule, j’ai commencé tôt le matin. C’était un vrai défi technique car la lumière était forte donc il y avait beaucoup de contraste entre les zones d’ombre et de lumière. Je me suis servie d’un téléobjectif pour garder une distance sécuritaire et j’ai utilisé un filtre polarisant pour réduire les reflets de la lumière sur la rivière et les feuilles. Il peut se passer de longues périodes de temps entre les apparitions des ours, certains retournent directement dans la forêt après avoir pris un saumon, d'autres se prélassent pour le plus grand plaisir des photographes.

Depth of field - Profondeur de champs

Depth of field

I chose to photograph the back of this flower because I wanted to create an original portrait so I used a different perspective than the classic image of flowers. In order to have a blurry background, I used a narrow depth of field by opting for a large aperture of f/5.6. To demonstrate the depth of field in a composition, I took a second shot with a smaller aperture of f/14: we can see more details in the background because the depth of field is wider.

f/5.6, 1/500 second, ISO2000Canon EOS 5DS R - Canon EF 100-400mm f/4.5-5.6L IS USM

f/5.6, 1/500 second, ISO2000

Canon EOS 5DS R - Canon EF 100-400mm f/4.5-5.6L IS USM

f/14, 1/80 second, ISO2000

f/14, 1/80 second, ISO2000

Profondeur de champs

J’ai choisi de photographier l’arrière de cette fleur parce que je voulais créer un portrait original, j’ai donc utilisé une perspective différente que la photo classique de fleurs. Pour avoir l’arrière-plan flou, j’ai réduit la profondeur de champs en optant pour une ouverture de diaphragme élevée de f/5.6. Afin de démontrer la profondeur de champs dans une composition, j’ai pris une deuxième photo avec une ouverture de diaphragme réduite de f/14 : on voit plus de détails en arrière-plan car la profondeur de champs est plus large.

The story behind this shot - L’histoire derrière l’image

The story behind this shot

When we discover a new region, we have the advantage of observing the environment with more intensity and curiosity than locals. I took this picture during my first winter in the Comox Valley, a very long time ago. As a newcomer, I was mesmerized by the beauty of the estuary with the snow-capped mountains in the background and the high concentration of birds and marine mammals in that area. I thought the place had a lot of potential for nature photography. However the estuary is located in the heart of the town therefore it is surrounded by buildings and busy roads and I did not want them to appear in my shot. So I waited for a winter morning with some thick fog, which made the buildings disappear, and also created a beautiful atmospheric view. The sun was still below the horizon and the light was constantly changing so I quickly set up my camera and took this image.

Canon EOS 70D f/4.5, 1/400 second , ISO400 - Canon EF-S 18-135mm f/3.5-5.6 IS STM, focal length: 35 mm

Fog in the Comox Valley

Fog in the Comox Valley

L’histoire derrière l’image

Lorsque nous découvrons une nouvelle région, nous avons l’avantage d’observer l’environnement avec plus d’intensité et de curiosité que les habitants. J’ai pris cette photo lors de mon premier hiver dans la Vallée de Comox, il y a très longtemps. En tant que nouvel arrivant, j’étais subjuguée par la beauté de l’estuaire avec la chaîne de montagnes aux sommets enneigés en arrière-plan et l’importante concentration d’oiseaux et de mammifères marins à cet endroit. Le lieu offrait beaucoup de potentiel pour la photographie de nature. Toutefois, l’estuaire est situé au coeur de l’agglomération donc il est entouré d’habitations et de routes que je ne souhaitais pas avoir sur la photo. J’ai donc attendu un matin d’hiver avec un épais brouillard qui cachait les maisons mais qui créait aussi une belle atmosphère. Le soleil était encore sous l’horizon et la lumière changeait constamment, j’ai donc rapidement effectué mes réglages et j’ai pris cette photo.

Canon EOS 70D f/4.5, 1/400 seconde , ISO400 - Canon EF-S 18-135mm f/3.5-5.6 IS STM, longueur focale : 35 mm